
"There’s a lot of different directions you can take with this project, and plenty of fun ways to update, improve, and personalize these cool, cozy chairs."
Materials
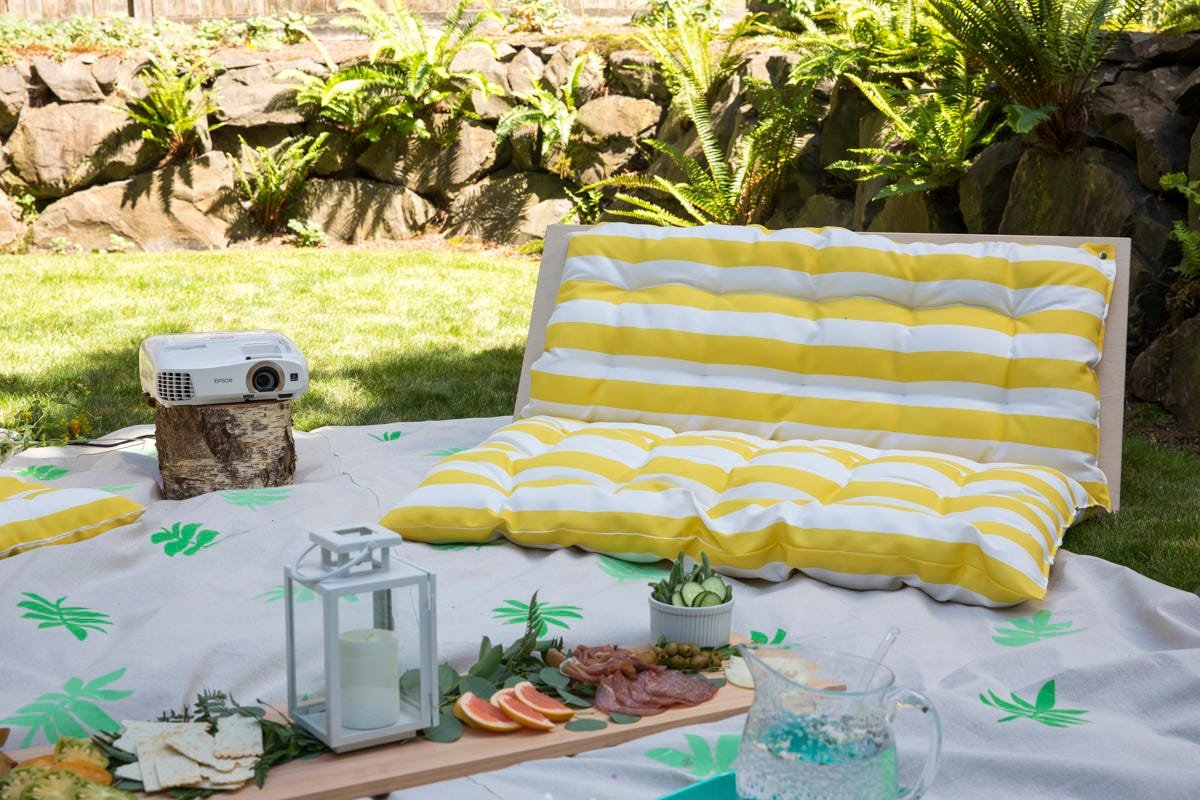
This summer, Dunn DIY is celebrating the warm weather by hosting a movie night! So far we’ve made delicious kettle corn and extra-yummy maple bacon kettle corn and a lovely canvas picnic blanket. This is part three of our four-part series. Stay tuned for the final part next week!
This project was the inspiration for the outdoor movie night series. I came across a design for a lounge chair with a wooden back support and cushions, and decided to create my own! I like that it’s simple while making a movie night more of a special occasion—and that it’s easy to fold up and store during the winter months because unfortunately, summer doesn't last forever!
For the Wood Back
Step 1: Cut plywood to size with a circular saw
For this project, I went with ½-inch birch plywood—the cheapest one I could find.
The measurements are based on ease. For each small chair, you’ll need two 24” x 24” pieces of plywood, and for each large chair, you’ll need two 24” x 48” pieces of plywood. When I purchased the plywood, I asked a sales assistant to cut it into quarters. This way, it was already cut into 24” x 48” pieces, and I only needed to make cuts for the small chairs. Be careful, though—a 48” piece of plywood may run a little long, so you’ll want to double-check you’re cutting down the middle when you cut the plywood for the small chairs. Out of one sheet of plywood, you can get two large chairs or four small chairs.

Step 2: Sand
Either with a sander or by hand, smooth the edges of the plywood so there aren’t any sharp edges or splinters. I used a fine/medium sanding sponge—the equivalent of 100- to 150-grit.

Step 3: Attach hinges
The hinges I’m using are 48” long. For a large chair, you don’t need to cut it down at all. For a small chair, you’ll want to cut it in half. I chose this particular hinge because the screws are short, which works well because our plywood is only ½-inch thick. If you want to work with a more traditional hinge, you’ll need thicker plywood since the screws will be longer.
For the small chair, the hinges will need to be cut down with a hacksaw to 24”. If you’re making two small chairs, you can cut a 48” hinge in half and use one for each. Cutting hinges sounds intimidating but is actually really easy. It doesn’t make sense to me that one metal can cut another metal, but that’s probably because I wasn’t paying close enough attention in science class.
To start, line up the hinges along one edge of the plywood. For the big chair, it will be the long edge. I like to fold the hinge over the edge of the plywood as a placement guide. Screw the hinge in place. Pre-drilling isn’t necessary, but go ahead and do it if it makes you more comfortable. Lay the second piece of plywood next to the first, and line up the edges. Screw in place.


For the Pillows
Step 1: Cut pillow fabric
Start by measuring out the fabric for your chair. For the large chair, you’ll want a 96” x 60” piece. For the small chair, you’ll want 48” x 60”. I picked up the fabric and the snaps (more on those later) at a local favorite, Pacific Fabrics. To make things easier, I asked them to cut the fabric to 2 2/3 yards for the large chair and 1 1/3 yards for the small chair.
Again, I chose these measurements to keep things simple. If you want the cushion to be the exact same size as the plywood back, you’ll have to make it big enough to include extra space for a seam. I wasn’t worried about it, so I didn’t.

Step 2: Sew together
Fold the fabric in half so that you end up with 48” x 60” for the large chair and 24” x 60” for the small chair. Pin the fabric in place and sew together the top and bottom, leaving one long side open. It’s not necessary, but I also like to sew the folded edge so each side of the pillow has the same sewn, finished look.
I sewed partway up on the open side to leave room to stuff the pillow.


Step 3: Divide upper and lower cushions
Once the sides are sewn, trim the corners and turn the pillowcase inside out. Measure down 24" from the top and sew a line straight across, starting and ending about an inch from the edge.


Step 4: Fill cushion
Fill the cushion with polyester fiberfill stuffing. This is the same stuffing I used on the cloud light project back in January. I was surprised to learn how much stuffing it takes to fill a pillow—I actually went back and restuffed these pillows because I didn’t think they were full enough. I think I ended up putting about 2 ½ pounds of stuffing into each of the small chair pillows, and 5 pounds of stuffing into the large chair pillows.
Once the pillows are stuffed, fold under the edges of the open side and pin them together, then sew shut.


Step 5: Measure out grid for dimples
People often create little dimples in cushions with buttons. I love the look of it but hate sitting on buttons, so I left those out. We’re basically sewing a stitch at various points in the cushion here. The stitches are mostly aesthetic, but they do help keep the stuffing in place.
Mark where you’d like to place the dimples with a pencil—I placed ours 8" apart from each other. Then, take a long needle and thread with doubled thread to add strength. Sew down through the pencil mark and then back up again, creating an “X”. Repeat a few times to reinforce the stitch, then tie off with a knot.
I found that if you tie a knot, sew down through the pillow and pull it back up, the tension on the thread basically pulls the knot through the fabric. You have to pull the needle down through the fabric, then back up, then thread it between the two threads where the knot is. You create a little loop so the pressure isn’t as great on that one particular spot. Let’s just say I spent a lot of time sewing dimples.

Step 6: Add snaps
Like grommets, snaps are something I’ve always wanted to try. The idea is pretty similar to adding grommets: you cut a hole in the fabric, put the pieces together, and then hammer down the metal so everything connects. I added these snaps so the fabric cushion can snap onto the plywood back instead of sliding around. To get started with this step, I attached the top of the snaps to the corners of the fabric pillow, and then I took the back piece and glued it onto the plywood.
I used super glue for this part and, in rare form, I had a mishap. I swear I have a great record with superglue, but I’m used to the gel kind, and this was a liquid glue. It works a little differently, and unfortunately, this stuff got stuck in the tube. I was squeezing and squeezing and nothing was coming out, and then all of a sudden, it all came out at once. There was glue all over the snaps and my hands, somehow. I don’t think I fully understood how quickly superglue dries until that moment. It was probably only a second or two before I could feel my fingers starting to attach to the snap and to each other. I quickly dropped the snap, spread my fingers wide, and then went through the fun adventure of figuring out how to get super glue off my hands. The trick? A combination of nail polish remover with acetone and butter. The mixture loosened it enough so that I could peel it off. It was an arduous task, but it worked! I think I’ll stick to gel superglue in the future.
If you’re not up for the adventure of sewing, dimpling, and snapping your own pillows, you can buy lounge chair cushions or single pillows. There are tons of options out there, so don’t feel you have to sew your own if you’re not comfortable with a sewing machine.


Step 7: Add a chain
I wanted to be sure the chairs would stay in place, so I came up with this solution.
Use a hook-and-eye and some chain in between the two sides of the plywood to control how far apart they spread. If you’re sitting in the grass, the plywood should pretty much stay where you place it, especially if you dig the wood into the ground a bit. For a deck or a hard surface, I’d recommend playing around with a chain for more control.

This was kind of a tough project for me, and there’s so much more I could have done. If you’re doing this project at home, you can paint or stain the plywood, or even just spray on a polyurethane finish so they’re protected from the rain. Let’s be real—you know you’ll leave them out even if you’re not planning on it! There are a lot of different directions you can take with this project, and plenty of fun ways to update, improve, and personalize these cool, cozy chairs.
