
One of the main stressors of performing a remodel project is protecting the existing home from the elements. That’s why I take weather protection seriously, and have developed systems that ensure I don’t invite undue risk.
Weather can introduce complications all year long. I’ve experienced this firsthand, when setting up a pretty extensive tarp system on a hot midsummer day. The owner came to me in the middle of the setup; a little perturbed that I was wasting his time and dollars for something he viewed as unnecessary. I gently informed him of my responsibility to protect his home from rain and nighttime dew. He wasn’t happy that day, and walked away grumbling something under his breath. Well, that weekend we experienced one of those northwest deluges that sometimes blow through. The next Monday, the owner apologized and thanked me for saving his home. Heed this lesson: there’s no point in losing to Mother Nature!
I’m going to share some of my techniques for installing the most widely available of all tarps (the blue or brown variety) used over a standard framing structure. Here’s how to get it done:
1. Create Space in Your Budget
Be sure to add dollars to your budget for weather protection. Setting up a tarp the right way at the outset will save money in the long-run, whereas having to fuss with tarps throughout the life of a project can be a real waste of time.
2. Choose the Right Tarp
Think outside the box. Is the tarp going to protect against dew on plywood, or is this a second story addition where the roof will be removed? Is the site prone to wind? Is there living space below, or a less critical area like an unfinished garage? Asking questions like these will help to determine the type of structure and materials needed, without overkill.
The simple fly works well over a camp site. Collapsible tents are great for use over workstations. Wrapped scaffolding can protect workers and exterior building walls. For a truly robust approach, a superstructure built over a second story will remain in place over a long period of time.
3. Think About Tarp Size
This is determined by the area of the exposed space in need of protection. The tarp must be oversized, accounting for overlap at the sides and ends of the wood superstructure. Two or three tarps may be required.
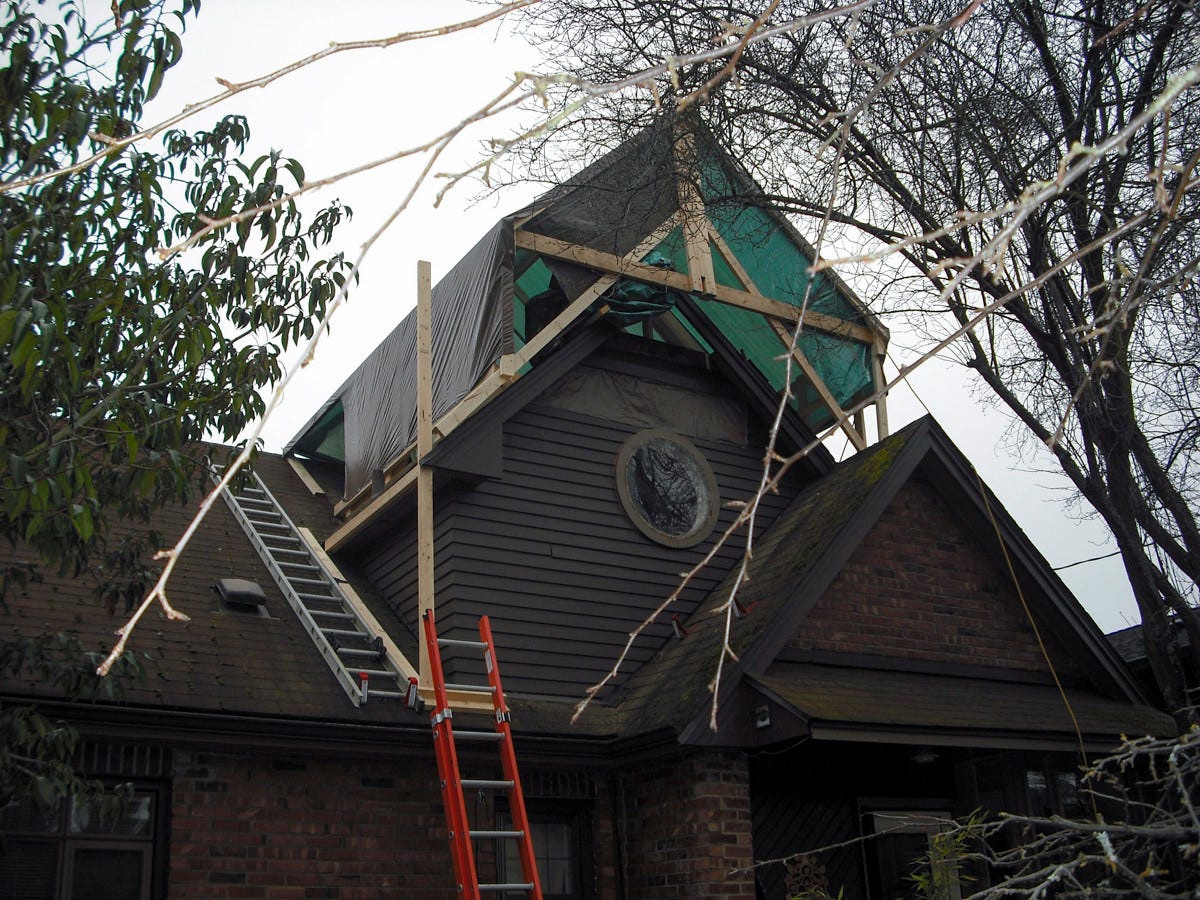
4. Build the Superstructure
There are different materials that can be used for tarp support, from framing lumber to PVC pipe, scaffolding, or aluminum I-beams. For securing the structure, look into grommet attachments, rope, staples, heat reactive joints, and adhesive tape. Be creative, because one solution doesn’t fit every scenario!
I like to use framing lumber for supporting tarps; it can be cut, screwed together, flexed, posted, spanned like rafters, and easily removed and reused later. Start at the bottom, installing posts and cross braces first. Tie into the house as much as possible, making sure there is room to perform work on your project without the protective structure getting in the way.
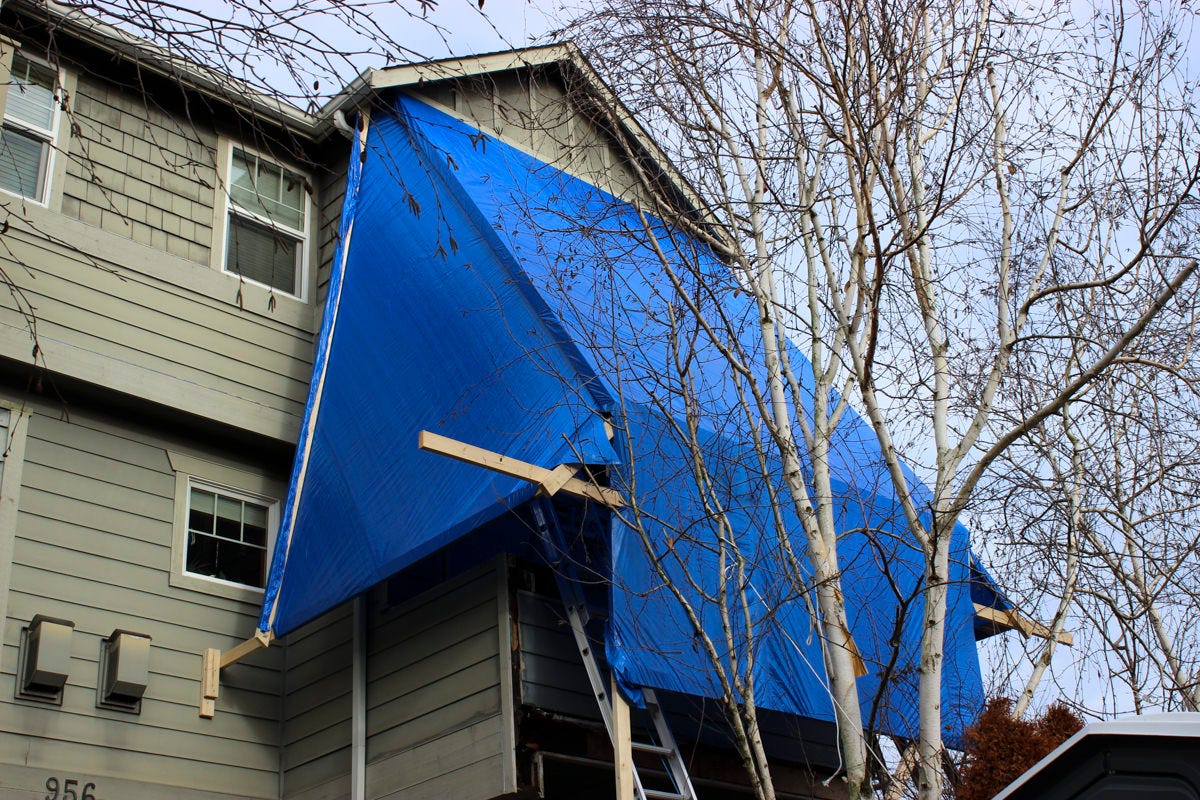
5. Install the Tarp
One reason why blue or brown tarps work well is because they can be pulled tight. Make sure the tarp is right side up. The best way to secure the tarp is by using ½” staples in the framing. Secure one side first. Then go to the middle of the opposite side, pulling tight to remove all the wrinkles as you go. I like to fold the ends of the tarp where I staple it into the wood for added strength, and aim to place a staple every inch just like sewing a seam. If the tarp isn’t tight like a drum, it will flap and collect water—so keep it taut. Don’t be afraid to cut off excess material.
6. Final Tips
- Wind shear can be a real problem. If it’s possible to slope the tarp toward the prevailing winds, doing so will cut the wind down inside your protected work area. It’s good to keep the ends of your protective structure open in some way to allow the breeze through, or it will build pressure in the interior space—creating a kind of balloon effect. Keep the tarp tight so wind doesn’t have anything to catch on.
- Clear or white tarps will trap a lot of heat like a greenhouse and make work uncomfortable. Using darker colored tarps will keep things pleasant, but temporary lighting might be necessary.
- If the tarp gets punctured in some way, I find Gorilla Tape on the underside works well as a solution. I’ve also made patches out of a small piece of tarp with Sikaflex or marine caulk working as my glue.
- For added protection, I like to occasionally add a secondary tarp to the underside of my framed structure. I’ll then staple sparingly to catch any pinhole leaks that might occur.
A little extra time and effort up front will go a long way to protecting your projects from weather and harm.