
"Creating the rock wall is where you get to let your creativity shine—place the rocks wherever you like and build your own custom climbing wall."
Materials
- 4 x 4 - 8' (6)
- 2 x 4 - 10'
- 2 x 4 - 12' (4)
- 2 x 6 - 8'
- EZ frame brackets (6)
- Swing hangers (2 pair)
- Climbing rock holds (3 sets)
- 5/16" x 5-1/2" Carriage bolts (6)
- 5/16" Flat washers (12)
- 5/16" -18 Stop nuts (6)
- 2-1/2" Trim head screws
- 3" Screws
- Wolman RainCoat clear water repellant
- End cut solution (if using treated lumber)
- 4 x 6 - 12'
- 2 x 6 - 10'
- 2 x 6 -12'
Warmer weather is on its way, and the days are getting longer. We wanted to create an outdoor project that could bring the whole family together for the summer, and what better way to make your backyard a kid’s oasis than with a swing set? With this DIY, we’re teaching you how to build your own set, complete with a climbing ladder and rock wall. Let’s get building!
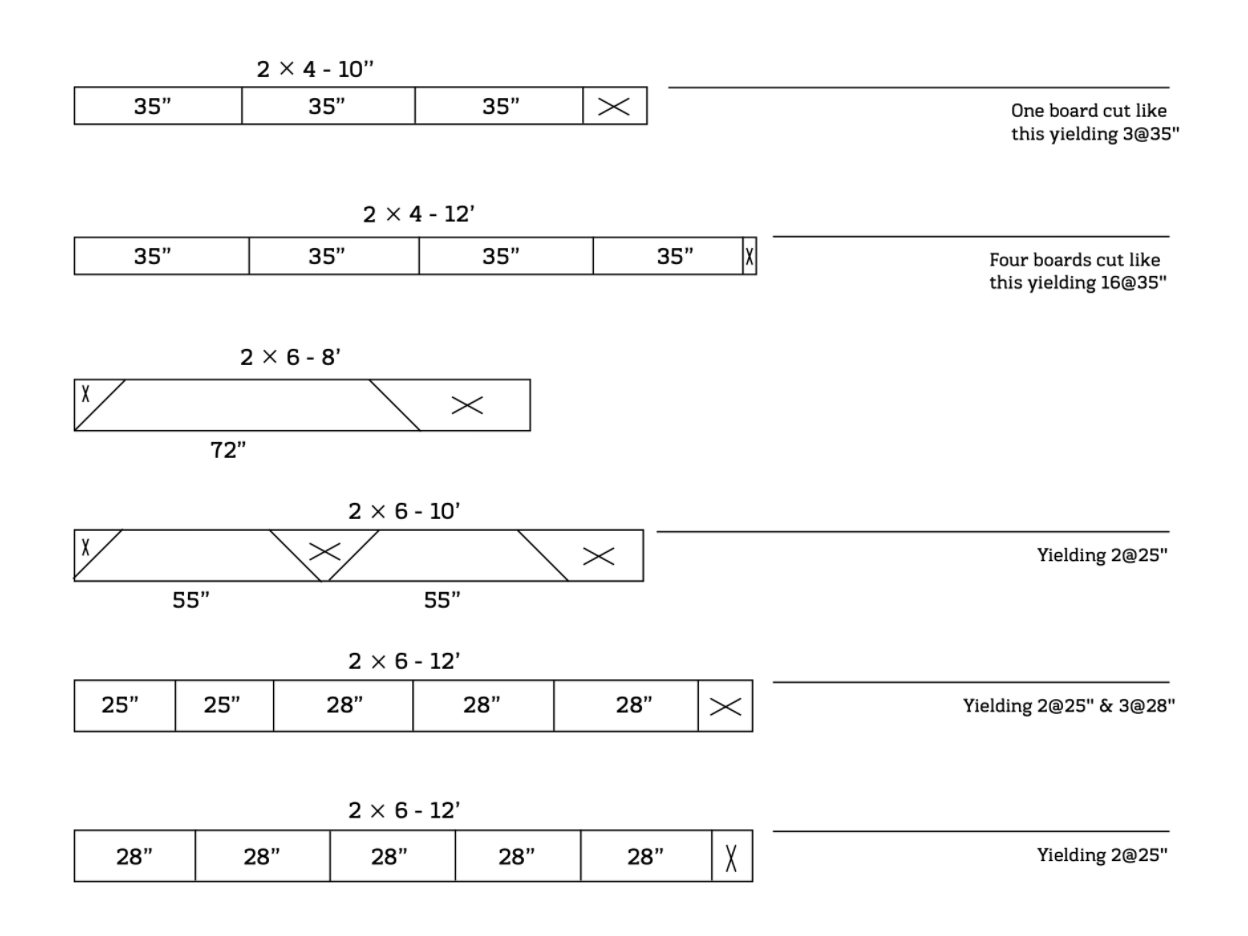
Step 1: Cut lumber
Cut your lumber according to the diagram below to duplicate our design. Then, treat the ends of your pieces with your end cut solution if you're using treated lumber like we did.


Step 2: Assemble A-frames
In this step, we’ll make three identical A-frames using E-Z Frame Brackets. First, lay two 8’ four-by-fours on the ground in an “A” shape. Then, lay a bracket across the top of the “A” and mount it to one of the four-by-fours using 2 1/2” screws. We used Screw Products flat-head wood screws, which are sturdy construction screws rated for outdoor use.
Position the second four-by-four so the spread between the bottom of the four-by-fours is 94 1/2” when measured to the outside of the posts. Mount the bracket to the second four-by-four.
Repeat for the other two A-frames.


Step 3: Build deck assembly
Using two 55” and two 25” pieces of two-by-sixes, we’ll assemble the platform frame. Place the 55” pieces standing up with the long end of the mitred cuts on the bottom, and create the frame by positioning the 25” pieces on end 9” in from the ends of the longer pieces. Secure together using 3” screws. We used Screw Products trim head screws, which hold tightly but have smaller heads that won’t be too noticeable.
Next, place eight 28” pieces of two-by-fours flatwise on top of the frame. This will create the deck surface. Screw down the two end boards first, then evenly space the remaining boards before screwing them down using four screws per board (two on each side).


Step 4: Attach deck to A-frames
With the two A-frames laying on the ground, mark 45” up from the bottom of the legs on both frames. Lay the 55” side of the deck assembly on one A-frame so the bottom of the deck aligns with the marks you made. Anchor in place with four 3” screws at each corner.
Lay the other A-frame flat on top of the deck assembly at the position you marked and screw securely in place. Make sure to insert the screws from the bottom, so they go through the deck assembly into the frame. Turn the structure upright.


Step 5: Mount ladder rungs
Measuring up from the bottom of the legs on one side of the structure, make marks at 10 1/2”, 24”, and 37 1/2”. Attach three 35” two-by-four ladder rungs so the top of the rungs align with the marks you made. Secure with 3” screws.

Step 6: Attach railings (optional)
If you’d like, you can attach two two-by-three 33” rails 14” above the deck surface. We skipped this step, but it’s a great optional addition if you want a little extra security for your kiddo.
Step 7: Build climbing wall
On the opposite side of the frame as the ladder rungs, we’ll create a 5’ climbing wall using 16 35” two-by-fours. Place the bottom of the first board 6” up from the bottom of the legs and screw into place on each end using two 3” screws. Once the first board is mounted straight, use a spacer to gap the next board, mount, and screw into place. Repeat until all boards are mounted.


Step 8: Secure climbing rocks
Now that we’ve created the wall, it’s time to mark the spots where you’ll mount your climbing rocks. We used tape, but you can use a pencil, too. This is where you get to let your creativity shine—place them wherever you like to create your own custom climbing wall. Make sure the rocks are inset from the A-frame posts, though, so they’ll bolt through.
Drill holes for your rocks using a 3/8” drill bit. Place rocks and mount them using the included bolts.


Step 9: Drill holes for swings
Using the diagram below, drill 10 vertical holes through the top edge of a 12-foot long four-by-six using a 5/16” drill bit.
Note: The diagram shows hole placement as measured from one end of the four-by-six, so you can hook a tape measure over one end and make your marks. If it's easier for you to know the distance between holes we've listed those measurements too in [brackets].
Counterbore the top of the fifth, sixth, seventh, and eighth holes about 5/8” deep using a 1 1/8” spade bit.
If using treated lumber, end cut solution should be applied to all holes and fresh cuts to preserve the wood. Apply now to the drilled holes.


Step 10: Mount swing hangers
Mount two pairs of swing hangers in the fifth, sixth, seventh, and eighth holes in the beam.


Step 11: Assemble third A-frame
Complete the third A-frame by fastening a 72” cross brace 24” up from the bottom of the legs.
Place the completed third A-frame on top of the four-by-six beam so the holes in the A-frame bracket align with the ninth and tenth holes in the beam. Mount the frame to the beam using 5 1/2” carriage bolts, lock nuts, washers, and 2 1/2” screws. Tighten the bolts using a wrench.


Step 12: Complete frame and hang swings
Turn the A-frame and beam right side up, and place the beam across the top of the rock wall structure. Fasten the beam to the top of the deck frames just as you did the single frame.
Then, hang swings of your choice from the swing hangers.


Step 13: Apply water repellant
The treated lumber we used will hold its appearance better if you apply a water repellent when the wood is ready. A simple splash test will determine whether the wood is ready for this step. We used Wolman RainCoat, but feel free to pick the repellent that works best for you—just follow the instructions on the can.

Now you’re ready for some backyard fun! For more kid-friendly projects, try this flower box, this kid-safe bow and arrow, and this roundup of five great summer DIYs.


