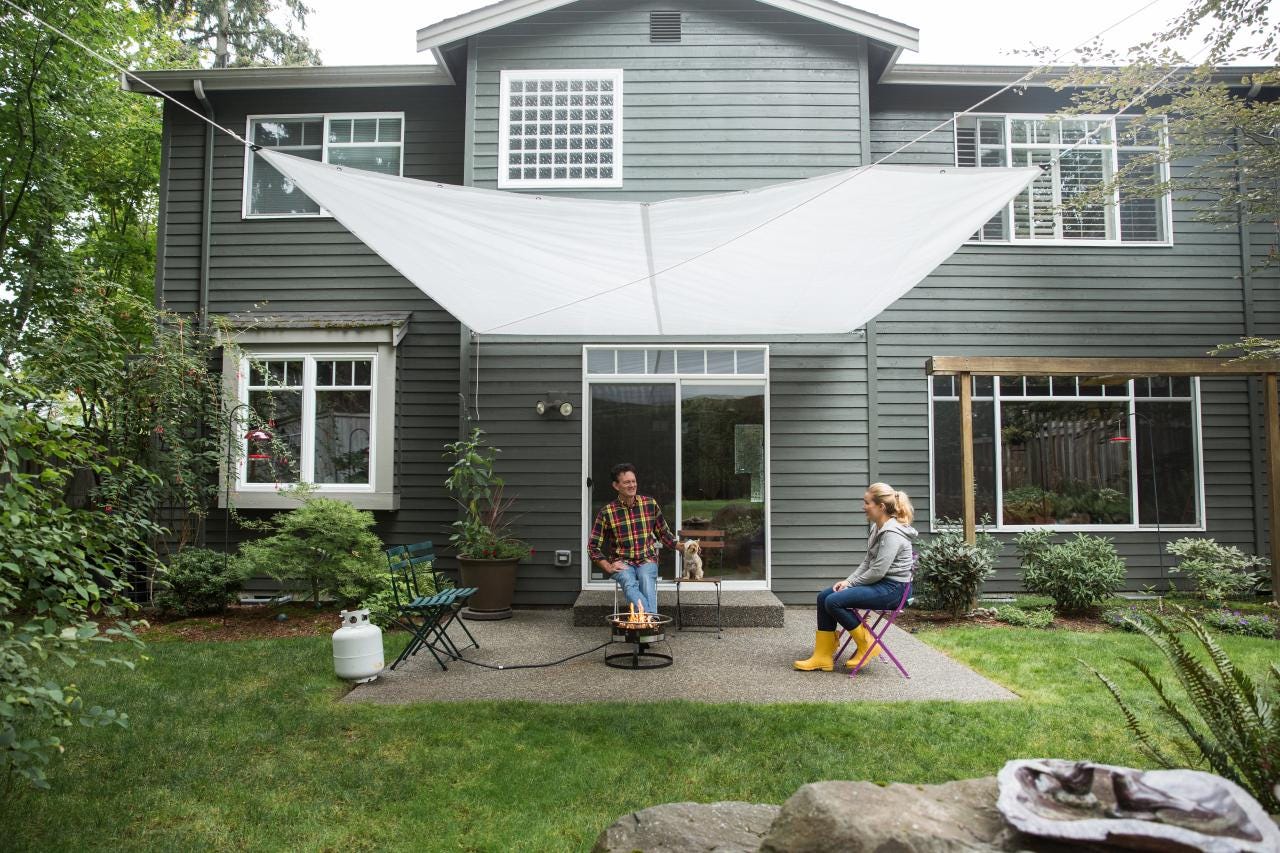

"There's no reason the end of summer has to mean the end of open-air gatherings—this DIY temporary outdoor covering gives you a dry space to safely social distance into the rainy months ahead."
Materials
Tools
Through a summer of social distancing, outdoor gatherings and backyard hangs have become the go-to method for getting together with others safely. Sunny weather has drawn to a close and our Pacific Northwest rains have returned—and that's going to make six-foot socializing outside a lot more difficult.
That's why we wanted to share this DIY temporary outdoor covering. The project is simple—it's basically just a tarp strung between sturdy anchor points—but it'll keep you out of the drizzle. You can also hang it so that fits a propane or wood-burning fire pit underneath to keep you warm into the cooler months.
This is one of those projects where no two situations are the same, so we’ve tried to show you a variety of hardware you can choose from to fit your space. Whether you're hanging your shelter between your house and some trees or placing temporary posts, you can design this covering to work in your outdoor area.
As always, safety first! This project is intended to provide shelter from light rain—not to stay up all the time. If the weather turns particularly blustery, you can quickly disassemble the covering to prevent your temporary "ceiling" from becoming a sail.
With this project, there's no reason the end of summer has to mean the end of open-air gatherings. This DIY canopy gives you a dry space to safely distance into the rainy months ahead.
Now let’s get to building!
Step 1: Pick a tarp size
Tarpaulins (or “tarps”) come in a variety of rectangular sizes—six-by-eight-foot and up. They also come in different weights and colors, so you’re not limited to the common, light-weight blue tarp. For our temporary shelter, we chose a heavy duty, twelve-by-sixteen-foot white tarpaulin, which has reinforced grommets about every 18 inches along all four sides. We special-ordered this all-white tarp from Dunn Lumber. It reflects a lot of light and keeps things brighter under the tarp.

Step 2: Determine mounting points
You might be tying off to trees, posts, poles, or other existing structures. Choose hooks or other fasteners that will securely attach to the corners of the tarp either directly or with rope. Always err on the sturdy side of things—you don’t want the weight of a tarp or tension on ropes to pull a mount loose, especially in a breeze.
Another thing to consider is height. You probably don’t want to brush your head against the tarp, so pick some spots pretty high up—probably at least eight feet higher than the ground. Another advantage of creating a high “ceiling” is you may be able to safely use a fire pit, depending on the final height of the tarp and whether the slope will allow heat to escape.
Mounting hardware might include some of the following:
- Tarp hooks
- J hooks
- Screw eyes
- Screw hooks
- Snap rings (these are like a carabiner)
- Hook/hook turnbuckle
- Hook/loop turnbuckle
- Eye bolts
For rope, we used 1/4” nylon line. For the corner where we put up a temporary post, we used ratcheting straps.


Step 3: Secure tarp to house
For our space, we’re going to attach two corners of the tarp to the house. We used brackets similar to a tarp hook and screwed them securely to the house. We used several snap rings in this project; they're like a carabiner and snap closed around a loop, grommet, or other hardware. Here we used a snap ring on one corner and a snap ring plus a turnbuckle on the other. The turnbuckle gave us a little more length and allows for adjustments later since it provides a way to take up slack or loosen as desired.


Step 4: Secure tarp to tree
Our space has a tree nearby to mount our third corner to. Using ¼” rope, snap clips, and a turnbuckle, we tied the third tarp corner off to this tree about ten feet up the trunk.


Step 5: Secure tarp to temporary post
Maybe you don’t have a tree or structure to tie one of your corners to. We decided we’d tackle that problem with a temporary post. Near the top of a four-by-four post, we installed three sturdy screw eyes. One will be for the rope that leads to the tarp and two will be for the straps that keep the post upright when tension is on it (i.e. when the tarp is tied to it). To keep the bottom of the post firmly on the ground and avoid it kicking out, we drilled a 6-inch-deep, ½-inch- wide hole in the bottom of the post and stuck a short piece of rebar in it. This is essentially a spike—so be careful with it once it’s sticking out.
To keep our temporary post upright, we will use ratcheting straps that run from the top of the post down to stakes driven into the ground. Mounting a screw eye near the top of the stake will allow the hook of the ratchet strap to attach easily to the stake. Find a spot for your stakes and drive them in place. Using two people, we strung the fourth corner of the tarp to the top of the post. Then, with one of us holding the post upright, the other person ran the ratchet straps from the top of the post to the stakes and tightened them.


Step 6: Mount a "ridge" line
If your tarp now looks like it might collect water, you’re in for trouble. Water weighs about a pound per pint, so puddling rainwater will quickly pull a tarp down—probably causing damage along the way. To avoid this we strung a rope under the tarp diagonally to make a “ridge". This was a simple task of stringing a line with snap rings on either end underneath the tarp and making it taught enough to lift the tarp - creating a bit of slope for rainwater to drain away to either side.


Step 7: Adjust tension
Adjust tension at any points that need it so that your tarp is relatively taught and won’t collect water if the skies suddenly open up.

Step 8: Enjoy your new space
Now you’re ready to set up your outdoor gathering space and enjoy open air with a temporary roof. Since our tarp was more than 8 feet off the ground, we were able to fit a propane fire pit safely underneath and position chairs around it. If using a wood-burning fire pit, you’ll want to angle your roof so as not to collect smoke and hang it well above the flames.


If you’re looking for more projects to elevate your outdoor gathering space, check out this DIY tabletop fire pit, outdoor side table, and beverage cart at DunnDIY.com.