
"This upcoming Memorial Day, Dunn DIY would like to extend our gratitude to those who have fought for our country."
Materials
This upcoming Memorial Day, Dunn DIY would like to extend our gratitude to those who have fought for our country. The most important aspect of Memorial Day is remembering the veterans who have given their lives for our freedom—whether they be loved ones or strangers—but Memorial Day weekend is also a time associated with the beginning of warmer weather.
When I think of Memorial Day weekend, images of summer fun come to mind: barbecues, lawn games, time with family and friends, and camping. And while that may be the case for sunnier cities, living in Seattle means sunshine in May isn't a guarantee. So this year, instead of giving you an outdoor project, we’re sticking to an indoor project you can make over the weekend if the barbecues aren’t fired up.
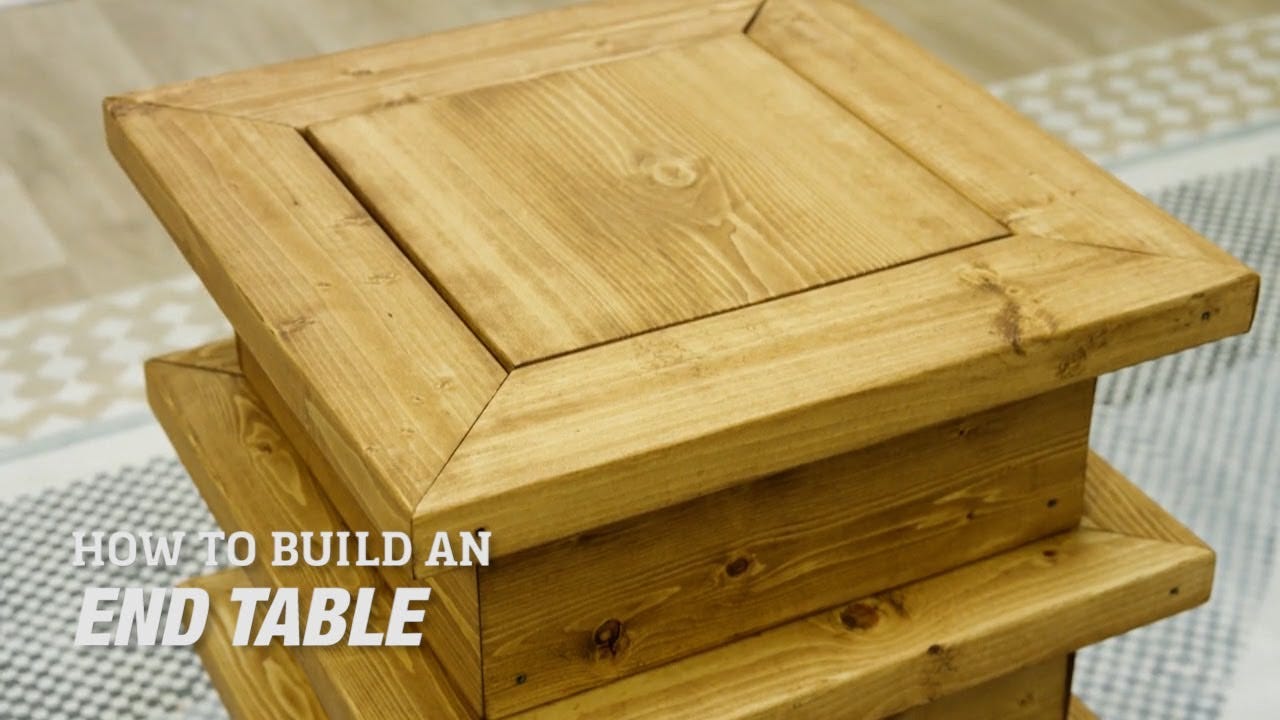
In my head, I was expecting this end table to have a clean and precise aesthetic, not unlike the nightstands I made for a Dunn DIY post in spring of 2018, but I overlooked one important detail. I used two-by material because I liked the chunky look, and spruce two-by-sixes cost less than one-by-sixes since they’re construction grade. I also thought if both the two-by-fours and the two-by-sixes were the same thickness, lining everything up would be really easy. The problem with that decision was that 1 1/2” material (the actual size of two-by material) is much harder to manipulate than 3/4” material (the actual size of one-by material). With the nightstands I built, there was enough 3/4” material to accommodate the inflexibility of the four-by-four posts. So while I was hoping for a precise finished product with this DIY, I ended up with something a little more rustic-chic. The end result still has a really nice impact—it just wasn’t quite what I’d envisioned. If you want to accomplish a sleeker finished look, I’d recommend using one-by material instead.
The other problem I faced was just an unfortunate oversight. When purchasing screws, I thought about the two-by-sixes and assumed the length of screws needed would be the same for the two-by-fours since they’re the same width. But the two-by-fours are laid flat, whereas the two-by-sixes are situated on edge. So the screws were way too short to attach the two-by-four pieces together.
On top of that, I picked out the new Pico screws from Screw Products Inc.—they’ve been my recent favorite because of their color, head size, and general design. Unfortunately, these were not the right screws for this project. Pico screws are designed with threads near the head of the screw that run in the opposite direction of the rest of the threads. This prevents the wood from splintering up around the head when secured. However, it makes removing screws more challenging and less clean. The specific length of the screws combined with the angle of the boards meant the screws didn't pull the wood together tightly, and there were a number of screws I couldn’t remove at all. This is a project where you really need the freedom to remove screws and drive them in again to get the tightest fit between the pieces of wood. So while the Pico remains one of my favorite screws, I would opt for a more standard screw for this project. Let’s get started!
Step 1: Cut wood
Measure the width of the one-by-twelve (approximately 11 1/4”), and cut it into a perfect square. Cut a two-by-four with opposing mitered angles to create a frame around the one-by-twelve square. The inside length should measure 11 1/4” to match the square. This frame and the one-by-twelve center will make up the top of our side table. Cut 12 more lengths of two-by-four with opposing mitered angles to the same length as the top pieces.
Cut the two-by-sixes into 12 lengths with the same inside dimension as the two-by-fours (11 1/4”) and with opposing 45°angled cuts, but make them beveled instead of mitered so the pieces form a box rather than a frame.
All pieces can be cut with a circular saw, but for the two-by-fours, you can use a handsaw and miter box for more control. For the rest of the boards, I like to use a Speed Square as a guide for the circular saw.


Step 2: Pre-drill with Kreg jig
Each of the tiers will be built using screws on the outside, but in order to secure the tiers together, we’re going to be using pocket screws on the inside of the two-by-sixes. Follow the directions for the Kreg jig and set up the depth of the pocket hole guide and the drill bit. On the inside of a two-by-six (the 11 1/4” side), clamp down the Kreg jig and drill two holes on either side. Position the holes closer together on one side and farther apart on the other. This will keep the screws from running into each other when they’re secured into the two-by-four tiers. Pre-drill all of the two-by-sixes this way.


Step 3: Sand
When I’m building a piece of furniture, I always like to use a sander and take my time to get the best finish possible—especially when I’m working with construction-grade lumber. It’s not designed to be used for furniture, so it needs a little extra care to look it’s best. Start with 100-grit sandpaper for rougher sections and to remove stamps or paint flecks from the painted ends. Then, move up to 150-grit and, finally, to 220-grit sandpaper.
The power saw I used to make my cuts left a piece of uncut wood on some of the angled edges. Left as is, this would get in the way of the pieces fitting together, but the extra pieces were easily removed with a sander.

Step 4: Assemble tiers
Assemble four squares of two-by-fours by securing each corner together with two 2 1/2” screws and glue (I didn’t do this because my screws weren’t long enough to use two in each corner, but this is what I would recommend). Make sure to pre-drill the holes for your screws. You’ll also need to check to make sure the one two-by-four square is still big enough to fit the one-by-twelve square inside of it. This step is easiest with an extra set of hands or a picture-frame clamp.
Assemble the three two-by-six tiers on edge with two 1 1/2” screws in each corner. Make sure your Kreg jig pocket holes line up so the holes that are closer together are all on the same side and the holes farther apart are all on the same side, too. Otherwise, you might end up with screws running into each other, and that's always a pain.


Step 5: Construct tabletop
For the one-by-twelve tabletop, we added a ledge for it to sit on so it could be removed and the inside of the table could be used for storage (but this is optional). If you’d like to include this step, you’ll first need to secure one of the two-by-six tiers to the top two-by-four tier with 2 1/2” Kreg jig screws (we’ll do this with the rest of the tiers in Step 6). Fit the one-by-twelve square inside of the top two-by-four tier, and flip it upside down on a flat surface. I recommend using a drop cloth or a towel to protect the sanded surfaces. Measure and cut one-by-twos to fit inside of the two-by-fours. Let the one-by-twos sit on top of the one-by-twelve and secure to the sides of the two-by-sixes. I did this with 1 1/2” screws, but because these have to be secured at an angle it’s difficult to keep the one-by-twos in exactly the same spot. The easiest way to secure these pieces would be to add wood glue and let them dry in place before continuing on.
If you don’t want a removable tabletop, you can glue the one-by-twos to the tabletop as well as the sides of the table.


Step 6: Assemble tiers
With your tabletop right-side up on your work surface, stack it on top of one of the two-by-four tiers, securing with 2 1/2” Kreg jig screws. Continue to add tiers—alternating between two-by-four and two-by-six layers—by alternately flipping the table right-side up and upside down to drive in all the screws. Alternate the pocket screw holes on the two-by-six tiers so the screws don’t run into each other in the two-by-fours.
In theory, each of the tiers should be perfectly lined up on the inside edges, but because life is imperfect, we’ll want to make sure the outside edges look lined up. I used a combination square for this, but you can eyeball it if you don’t have one. This is also a good time to choose a front and a back for your table and face the best sides in the same direction.


Step 7: Stain and finish
The last step is to stain and finish your side table. You can stain the table to your desired color or leave the wood raw. But either way, finish your table with several coats of clear polyurethane to protect it from stains and watermarks.


You’ve now got your very own end table! If you need something to put on top of it, check out our tutorials on how to make mini succulent planters, hexagon coasters, and a wooden paper tray.

