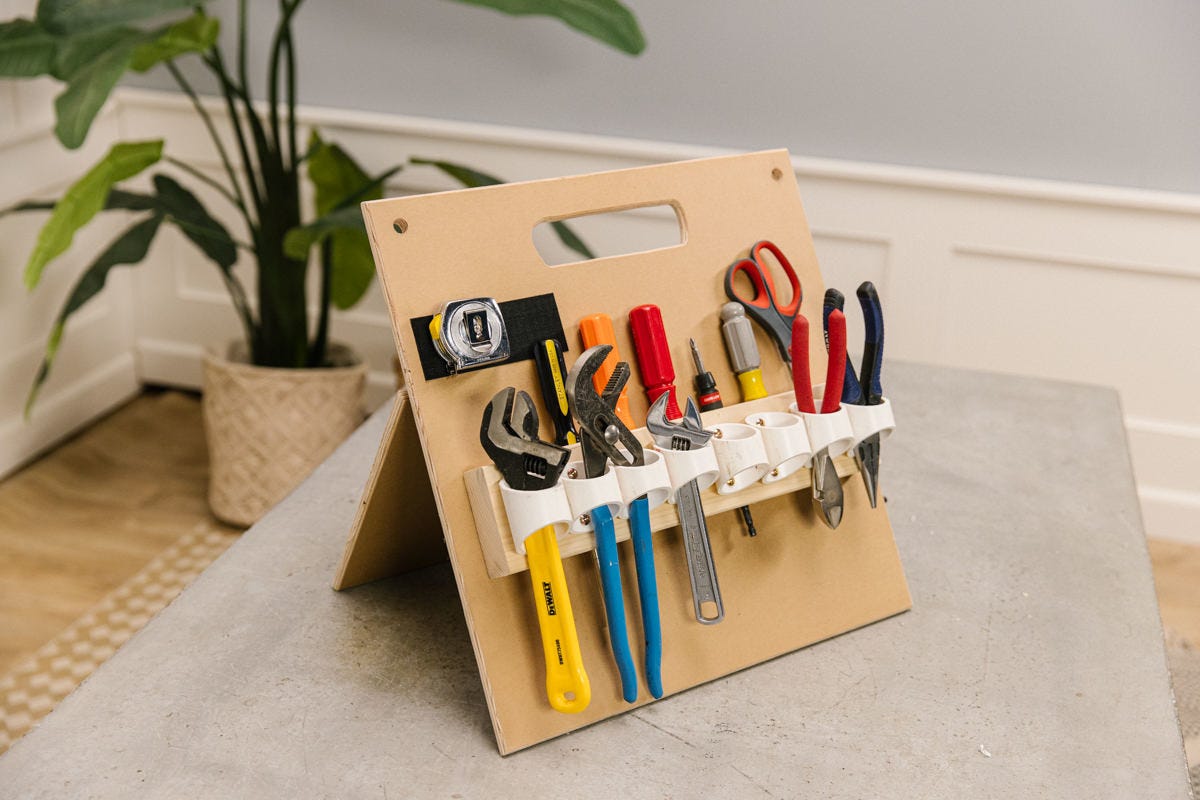

"This nifty tool caddy lets you customize storage attachments to suit just about any project. Build two or more to create a custom wall-mounted storage system perfect for a garage or shed."
Materials
We’re welcoming Jason, the mastermind behind our wall-mounted bookshelf, back into the DIY studio this week! He’s showing us how to build an ultra-versatile tool caddy that’s incredibly accessible to any level of DIY skill. He drew inspiration for this project from Family Handyman, another great online DIY resource.
This caddy is akin to a sandwich board and it’s essentially an empty canvas: You can add custom tool holders to the face of the board to organize just about anything. While we designed our tool holders to hold basic household tools like screwdrivers, you could design tool holders specifically for a gardening kit, car wash materials, or bicycle repair tools—the possibilities are nearly endless.
Grab your materials and let’s get to it!
Step 1: Cut plywood pieces
The caddy is made of two pieces of plywood: the face board in the front and a kickstand in the back. While we used MDO plywood for this one, you can use a multitude of materials (PVC plastic, for example) cut to whatever size you’d like. MDO comes in four-by-eight sheets, which is more than you need, but we bought a partial sheet at Dunn Lumber and had an associate cut our pieces to size, which saves an extra step here.
For our caddy, we sourced the following:
- (1) 18” x 18” square (the “face” of the caddy)
- (1) 11 ½” x 18” rectangle (the kickstand)
Step 2: Mark handle hole
This next step involves cutting a slot with a jig saw. If you don’t have a jig saw, you could mount a metal handle using through-bolts.
A generous slot in the top of the panel makes for easy carrying. To cut the hand slot, measure 1 ½” down from the top edge of the large square panel and mark the top edge of the handle hole; then, measure another 1 ½” down from that to mark the bottom of the hole. Draw lines 6” long (horizontally)—3” to each side from the center. Then, connect the ends of the lines in a curve shape to form the hole. (We used a roll of tape to make a curved line connecting the top and bottom lines.)

Step 3: Drill handle and mounting holes
Adding mounting holes is a clever addition allowing you to hang the caddy on the wall when it’s not in use. We spaced our holes 16” apart on-center to line up with wall studs. Mark where you’d like your holes to be, clamp the square down, and drill the two holes using a ½” spade bit
Use the same spade bit to drill a hole at the edge of (and completely inside of) the oval you drew for the carry handle in Step 2. Then, use a jig saw to cut along the oval line and cut out the entire handle. Use a router or sanding sponge to round the inside edges—this will make it more comfortable to carry.

Step 4: Install kickstand hinges
We used a pair of 1 ½” hinges to join the kickstand to the square face. Along the top (18”) edge of the smaller piece of MDO, measure 4 ½” in from both sides of this piece of MDO. Center one side of the hinge there, mark and pre-drill holes for the hinge in the center of the edge of the MDO, and mount one side of the hinge to that edge.
Next, line up the bottoms of each piece of MDO. Open the other side of the hinge against the larger piece, mark and pre-drill holes for screws, and attach the other wing of both hinges by hand. We substituted smaller screws here (shorter than what came with the hinges) so that they don’t poke through the MDO to the other side.
Step 5: Attach chain to kickstand
We used two 8” lengths of chain to connect the caddy face to the kickstand, which keeps the pieces from extending too far out. Measure 4 ½” up from the bottom of each piece, mark, pre-drill, and use #6 x ¾” screws to fasten the chain.
Step 6: Add tool holders
This is where you can customize your caddy to hold whatever you’d like. We used a piece of two-by-four and pieces of PVC pipe to hold screwdrivers and the like:
Cut and mount two-by-four
Cut a piece of two-by-four to 16” long. Then, clamp it down and use a ½” spade bit to drill holes down the center of the two-by-four all the way through the opposite end. We spaced our holes every 2” on-center.
Now, working on the back side of the caddy, find spots to drive screws through the back into the 16” long two-by-four. Jason taped the two-by-four in position on the front, but wrapped the tape around the backside too so that he’d know where to place the screws. He positioned the board about 10” down from the top and centered it. Attach the two-by-four by screwing 1 ¾” screws through the back panel into the backside of the two-by-four.
Cut and mount PVC holders
Cut eight short pieces from 1 ½” PVC pipe. We used a miter box to cut ours with opposing 22 ½-degree angles to about 2” long, measured on the long side. Use a fine tooth saw blade and clamp down the pipe so it doesn’t rotate with the saw blade as you cut. (You can also use a chop saw.)
We then used #8 x 1 ¾” screws to mount the PVC pieces to the two-by-four. Mark the spots along the board measuring 1”, 3”, 5”, 7”, etc., from one end so as to avoid the vertical holes drilled earlier in the two-by-four. Pre-drill through the inside longer wall of the pipe pieces at both ends using a 9/64” drill bit.
Now you're ready to load up your tools and get to work!
For more DIY home organization inspiration, check out our cedar shower caddy or this simple DIY wooden bathroom storage tower.