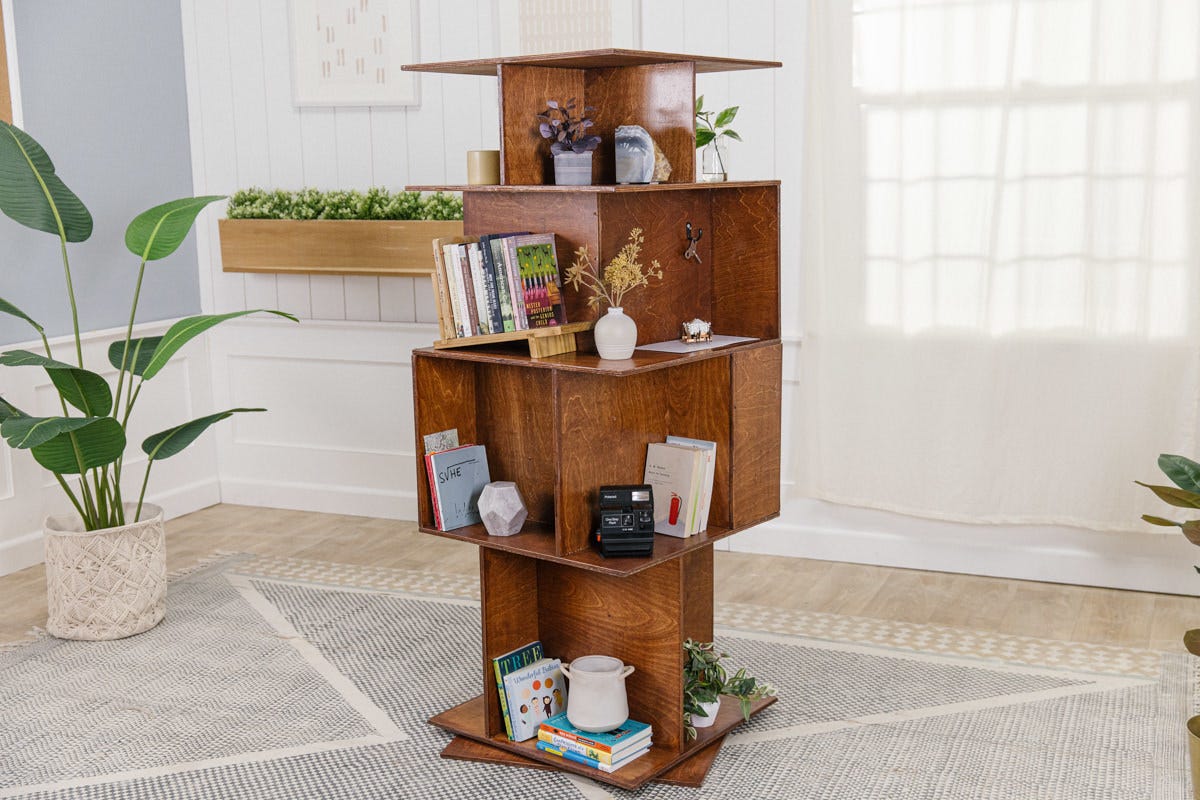

"Because this rotating bookshelf has so many different sections, it’s easy to arrange and organize whatever items you decide to use it for!"
Materials
You can never have too many shelves or storage options.
This week we’re joined in the DIY studio by our friend and Dunn Lumber employee, Alice. She has been a long-time DIYer, thanks to her mom’s love of crafting. Alice is also an avid reader who’s always needing more shelves to store her ever-growing book collection.
With four shelves on four sides, this DIY rotating bookshelf is both fun and functional, fitting more storage into a smaller space than regular shelves. It sits nicely in a corner, and can store not only books, but also toys, knick knacks, craft supplies, and more. Because it has so many different sections, it’s easy to arrange and organize whatever items you decide to use it for!
Step 1: Mark and make all cuts
Follow the cutting diagram below to mark all the necessary cuts on your plywood, then use a power saw to make all your cuts.
Cut list:
- Two (2) sheets of plywood
- Brace boards for Levels A, B, C, and D
- A.1: One (1) at 24” x 10”
- A.2: Two (2) at 11 ¾
- ’ x 10"
- B.1: Three (3) at 16” x 14”
- B.2: Two (2) at 8” x 14”
- C.1: Four (4) at 16” x 16”
- C.2: Two (2) at 8” x 16”
- D.1: Four (4) at 16” x 18”
- Six (6) horizontal baseboards at 24 “ x 24”
- Brace boards for Levels A, B, C, and D
Note that plywood is prone to chipping when you cut it, so make sure to use a fine finish blade and cut slowly for the clearest cuts possible. You can also prevent chipping by putting down painter’s tape, drawing your line, and then cutting through the line and tape. Alternatively, you can clamp your bookshelf plywood between two pieces of scrap plywood and cut through all three layers.
Step 2: Prepare cut pieces
Use sandpaper to sand down all the edges before applying your stain. We used gloves to spread the stain, then used a rag to soak up excess stain. We also only applied stain to the edges of outward-facing pieces.
Let the stain dry completely (this can take up to two days), and then go over all the pieces again with a clear wood finish. Again, let the finish dry completely before moving onto the next step.
Step 3: Assemble Level A’s vertical pieces
Now it’s time to assemble the four levels of shelves—you’ll want to pay close attention to the layout diagram in each step!
Start by sorting your cut pieces for each of the four levels, and find your Level A (A.1 and A.2) pieces. Line up the brace boards (or vertical pieces) as shown on the layout diagram and use clamps to hold them in place. (For Level A, we staggered the two smaller boards so we could still screw them into the middle board.) Make sure all pieces are straight and square with each other when attaching them together—this is critical to make sure the shelf is level.
Using a straight edge, mark on the underside of the boards where you want to place screws to attach them together. Three screws—one towards the top of the boards, one in the middle, and one towards the bottom for every point of connection—should be plenty.
Be sure to drill screws in slowly as the plywood is thin and can split.
Note: We used a lot of clamps while assembling the levels! The light-colored wood block you see in the photos was also used as a right-angle jig. If you don’t have clamps, you’ll want to have another person help to hold things in place.
Step 4: Assemble Level B’s vertical pieces
Follow the same directions as in Step 3 to assemble Level B.
Step 5: Assemble Level C’s vertical pieces
Follow the same directions as in Step 3 to assemble Level C.
Step 6: Assemble Level D’s vertical pieces
Follow the same directions as in Step 3 to assemble Level D.
Step 7: Attach horizontal pieces
Attach each level of vertical pieces to a horizontal baseboard. Alice outlined the shape of each level onto a separate baseboard, then placed the baseboard on top of the vertical pieces. This way, she could see where the boards touched so she knew where to drive screws.
Level A
Level B
Level C
Level D
Step 8: Attach all levels together
Once you have each level completed with the vertical pieces attached to a horizontal piece on one side, it’s time to connect them all together in order from A-D.
Starting from the bottom (Level D), place the next set of shelves (Level C) on top, make sure each shelf level is square with the one beneath. Using a level is a good way to confirm they are vertically aligned. Next, make a small line or mark on the outside edge where the lower shelves line up. From that mark, use a speed square or straight edge to mark a straight line on the upper shelf. This line will mark where your screws will go to attach the levels together. Repeat steps until Level D through Level A are all connected.
Then, use a horizontal piece and attach it to the top of Level A to cap off your bookshelf.
Note: Once you have all the levels attached together, you can squeeze wood glue into all of the seams to ensure they stay strong.
Step 9: Attach hardware
Now it’s time to make the bookshelf rotate by using a metal swivel plate, or Lazy Susan. These plates are pretty simple to attach to your project, but if you’ve never worked with one before, it may be a little confusing. The hardware you buy should come with directions, but we also recommend reading this tutorial of the installation method we used and watching some how-to videos (like this or this) before getting started—it really helps to see someone else install the hardware!
Your Lazy Susan hardware will have a top face and a bottom face. The bottom face should have at least one or more larger holes in it, plus smaller holes for screws. If you swivel this face around, the larger holes will align with smaller screw holes in the top face of the bearing plate. That's key to the puzzle: the large hole provides access for screwing the top face of the hardware to the project.
To install the Lazy Susan:
- Place your final baseboard down, and use a straight edge and pencil to draw perpendicular lines. Where the lines cross is the center. Alternatively, draw lines from the top-left to bottom-right corner and the top-right to bottom-left corner to find the center.
- Place the bottom face (with the larger holes) of the Lazy Susan hardware down in the center of the baseboard by lining up the four smaller screw holes with the center lines we just marked. Mark the four smaller holes and one larger hole.
- Remove the hardware, and drill a hole through the base to match the larger hole.
- Replace the hardware on the baseboard and fasten the four marked smaller holes with ½” screws, making sure the big hole you drilled lines up with the big hole in the hardware.
- Carefully turn the entire bookshelf upside down so that the bottom shelf faces up.
- Place the final baseboard face down on the upside-down bookshelf. Make sure the corners line up correctly, then use the big access hole to drive screws through the Lazy Susan hardware and into the bookshelf. (Our visibility was limited, so we used a flashlight to ensure we were screwing into the correct places.)
- Turn the entire bookshelf right side up. Now the bookshelf will rotate!
Note: If you want, you can also attach hooks in different spots for added functionality (see the last photo in this step).
Step 10: Fill it up!
Now your DIY rotating bookshelf is ready to be used. Place the bookshelf where you want it, and fill it up with books and more!
For more DIY indoor storage inspiration, check out our wall-mounted bookshelf or these underbed storage boxes.