
"This display case is a fun addition to any room. Whether it's set on a shelf or mounted on the wall, it's a great way to organize and show off your knick-knacks."
Materials
We got the idea for the display case shelf out of an old book called Woodworking For Kids. With a few tweaks and updates we came up with this!

Step 1
Using a chop saw, cut your 10-footer into the nine pieces needed for the frame and shelves.
- 2 – 22 ¼" sides
- 2 – 18"top and bottom
- 2 – 16 ½" shelves
- 1 – 10 ¾" shelf
- 2 – 5"shelves
Keep in mind that no matter how exact you are during this step you will probably need to trim off some edges later when you're fitting it together.
Step 2
Smooth out the ends of your cuts with a piece of sandpaper. We love using spruce because it's generally naturally smooth enough that it doesn't require much sanding. If you do end up with a rough piece, give it a once over with the 150 and then with the 220 sandpaper.

Step 3
First we're going to construct the frame of the shelf. Take the two 22 ¼" and the two 18" pieces. The 18" pieces will be your top and bottom and will be on the outside of the side pieces. With the 3/32" bit drill through the top piece into the side piece, making two holes. Fasten in two 2 ½" screws. Repeat drilling and screwing on the other side of the top piece. You can now turn the display case upside down and attach the bottom piece using the same method as on top.

Step 4
When the frame is put together it's time to do a dry fit. This will be a good time to make any necessary adjustments to the pieces. Taking the two longest shelves arrange them horizontally and vertically inside the frame. Fit in the three smaller shelves wherever you like the look of them. Cut any pieces down to size if needed.

Step 5
Once you've fit everything inside the frame use a pencil to mark where the shelves meet each other and the frame. Run a light pencil mark up and down either side of the ends. We recommend doing this in a systematic way or it's very easy to forget and hard to tell which ends you've already marked.

Step 6
Take the pieces out and attach the two longest shelves together. Pre-dill two holes down through the horizontal shelf into the vertical shelf lined up with the pencil marks. Apply a small bead of glue on the end of the vertical shelf before you secure the pieces with 2" screws. Fit the pieces back into the frame to make sure they still fit well.
Attach each additional shelf individually in the same manner fitting it back inside of the frame after each addition. The position of your shelves may need to shift slightly, or you may need to make a few more minor cuts.
After all the shelves are connected to each other you can apply glue to all ends and slide it into the frame, wiping off any excess glue with a wet paper towel. Pre-drill two holes through the frame into each shelf and secure with 2" screws.


Step 7
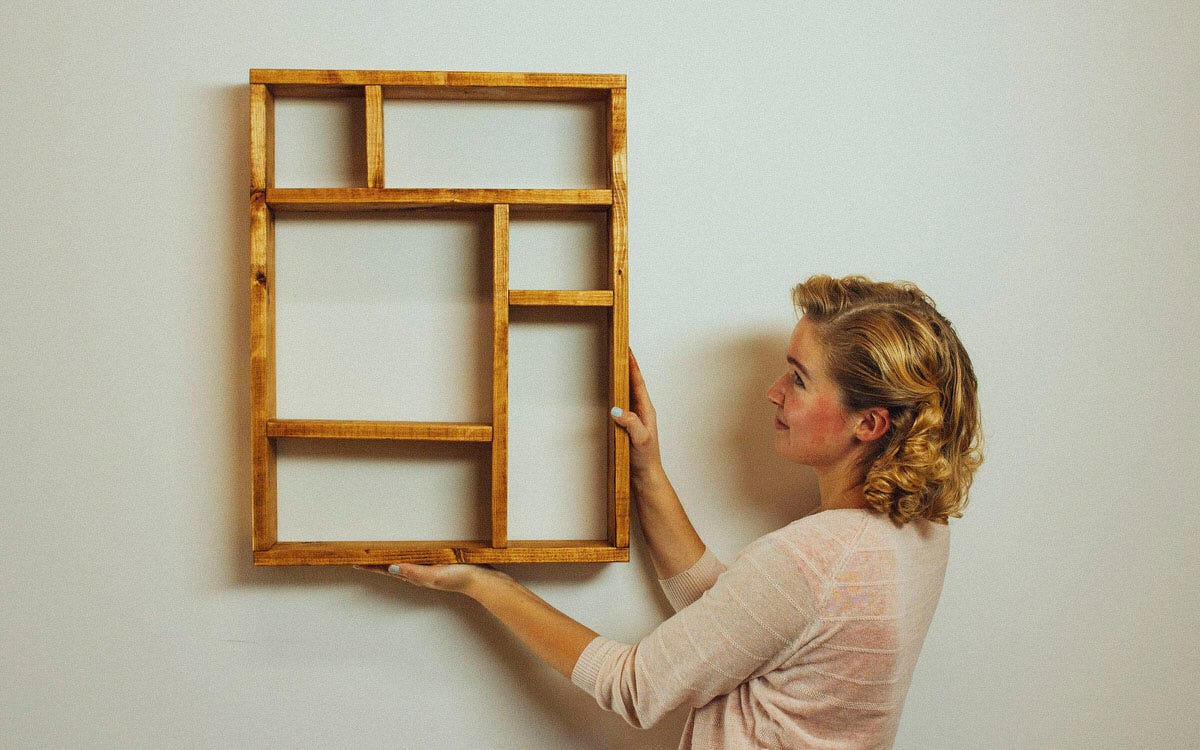
Your shelf is constructed, and you can lay out your drop cloth now because it's time to stain. Shake and stir the can of stain well and, following the directions on the can, apply the stain. We used Varathane wood stain in the color Provincial. This is one of our favorite stains because of the way it brings out the natural quality of the wood and adds a lot of color dimension. Wipe off any excess stain and allow to dry.Your display case is now ready to be put up. You can set it on an existing surface, but make sure that the bottom piece is nice and flat. Because of the wood we used ours rocks a little back and forth.

But that's okay, because we mounted ours! We used a couple ring hangers attached to the back of the shelf to fix it to the wall. Drill a small hole in the back of the shelf using the hanger as a guide, and secure the hanger in place with the screw provided. The hanger can either stick out above the shelf or hang down below the shelf. You can then use screws to mount it to the wall. If you're unsure about the best way to do this you can always talk to a Dunn Lumber employee.
